In this post I will go step by step through optimizing PHP and WordPress to reduce page load times and increase requests/second of your website.
- Assumptions and Pre-Requisites
- Install Apache Web Server
- Install MySQL
- Install PHP and Update Settings
- Install WordPress
- Install Apache Virtual Host for Example Domain
- Installing WordPress
- My Test Environment
- WordPress Performance Testing – First Run
- Enabling PHP OpCache
- WordPress Performance Testing – Second Run
- Third Test Run Setup
- Install PHP Extension for Redis
- Install WordPress Redis Object Cache Plugin
- WordPress Performance Testing – Third Run
- Conclusion of Testing
- Bonus Performance Section Using Reverse Proxy
- Conclusion (Final)
- Learn how to Setup Nginx as Reverse Proxy Server with Caching
WordPress is used on over 42% of all websites on the global internet. Considering that there are over 1.1 billion websites this comes to over 460 million website using WordPress to serve content to their customers.
Actual and perceived performance of a website is a major factor in securing and keeping visitors to your website. With Google search engine being the major source of traffic generation and therefore routing, they consider any websites’ page load time to be a major factor in SERP ranking.
Assumptions and Pre-Requisites
The only thing I am assuming before starting on this tutorial is that you have admin rights on the machine you are working on. The machine could be a physical machine, such as your desktop or laptop or a cloud based server.
I will provide instructions on how to configure your software on both Linux and Windows.
Let’s start…
Install Apache Web Server
If you have a Linux instance running then setting up Apache is easy. Use the command below to setup Apache web server.
sohail@d1:~# sudo apt install apache2Now we need to enable mod_rewrite. Use these command to enable it.
sohail@d1:/etc$ sudo a2enmod rewrite
Enabling module rewrite.
To activate the new configuration, you need to run:
  systemctl restart apache2

sohail@d1:/etc$ sudo service apache2 restart
sohail@d1:/etc$
Make sure the server is up and running by going to the browser and going to URL http://localhost. You will see the following webpage.

Install MySQL
Install MySQL as that is a required component for WordPress. In this step, I will install MySQL and then create a new user for WordPress and an actual database for it to use.
sohail@d1:~$ sudo apt install mysql-serverNow that MySQL has been installed I will go create a new user for WordPress and then will create a WordPress database and give permissions to the newly created user.
sohail@d1:~$ sudo mysql
Welcome to the MySQL monitor.  Commands end with ; or \g.
Your MySQL connection id is 12
Server version: 8.0.30-0ubuntu0.22.04.1 (Ubuntu)

Copyright (c) 2000, 2022, Oracle and/or its affiliates.

Oracle is a registered trademark of Oracle Corporation and/or its
affiliates. Other names may be trademarks of their respective
owners.

Type 'help;' or '\h' for help. Type '\c' to clear the current input statement.

mysql> CREATE USER 'wp'@'localhost' IDENTIFIED WITH authentication_plugin BY 'abc123';
ERROR 1524 (HY000): Plugin 'authentication_plugin' is not loaded
mysql> CREATE USER 'wp'@'localhost' IDENTIFIED BY 'abc123';
Query OK, 0 rows affected (0.01 sec)

mysql> CREATE DATABASE wordpress CHARACTER SET UTF8MB4;
Query OK, 1 row affected (0.00 sec)

mysql> GRANT ALL ON wordpress.* to wp@localhost;
Query OK, 0 rows affected (0.00 sec)

mysql> flush privileges;
Query OK, 0 rows affected (0.00 sec)

mysql> exit
Here I have created a new user wp with the password abc123 (yes really creative here).
Then I proceeded to create a database wordpress followed by giving the user wp permissions to use it. Finally, I flushed permissions.
Install PHP and Update Settings
On Ubuntu, you can install PHP using the following command.
sohail@d1:~$ sudo apt install phpI will then install the following additional PHP extensions.
sohail@d1:~$ sudo apt install php-curl php-mbstring php-zip php-imagick php-json php-xml

sohail@d1:/var/www$ sudo apt install libapache2-mod-php php-mysql
Not all of these are required but I still like to install them as these are usually needed by different themes and plugins I use.
Now PHP is installed. To make sure everything is running as expected I will add an index.php page with phpinfo() to ensure the installation is working.
sohail@d1:~$ cd /var/www/html

sohail@d1:/var/www/html$ vi index.php


###### Enter the following lines in the index.php file ######
<?php
phpinfo();
I have used vi editor. You can use whichever editor you are comfortable with.
To test if my setup is working, I will go and check the page at http://localhost/index.php.
 Output Example")
Great…all looking good for now.
Install WordPress
This is a multi steps process. First I will add my domain name to hosts file. Then I will create create a virtual host in Apache. Finally I will copy WordPress files to location specified in virtual host .conf file before starting the install.
Let’s start…
Update Hosts file
On Linux the file is /etc/hosts whereas on Windows it is C:\Windows\system32\drivers\etc\hosts. Open the file and add the following entry.
127.0.0.1 wordpress.localSave and close the file.
If you ping the file from console (command window), you should see the following.
sohail@d1:/etc$ ping wordpress.local
PING wordpress.local (127.0.0.1) 56(84) bytes of data.
64 bytes from localhost (127.0.0.1): icmp_seq=1 ttl=64 time=0.025 ms
64 bytes from localhost (127.0.0.1): icmp_seq=2 ttl=64 time=0.051 ms
64 bytes from localhost (127.0.0.1): icmp_seq=3 ttl=64 time=0.032 ms
Install Apache Virtual Host for Example Domain
Our domain is added to the hosts file. Now we are ready to create a virtual host for it so Apache HTTPD know where to go to serve pages.
On Linux go to the following folder and add a new virtual host by creating a file wordpress.conf.
sohail@d1:/var/www/html$ cd /etc/apache2/sites-available/
sohail@d1:/etc/apache2/sites-available$ vi wordpress.conf
Add the following content to wordpress.conf.
<VirtualHost *:80>
	ServerName  wordpress.local
	ServerAdmin [email protected]
	DocumentRoot /var/www/wordpress

	<Directory /var/www/wordpress>
		Options FollowSymLinks MultiViews
		AllowOverride All
		Order allow,deny
		allow from all
	</Directory>


	ErrorLog ${APACHE_LOG_DIR}/error.log
	CustomLog ${APACHE_LOG_DIR}/access.log vhost_combined
</VirtualHost>
Create files to the wordpress folder. The path will be as set in the DocumentRoot above.
Now copy WordPress files to the folder pointed to in wordpress.conf. In my case it is /var/www/wordpress.
Enter the command as shown below.
sohail@d1:/etc/apache2/sites-available$ cd /var/www

sohail@d1:/var/www$ sudo wget https://wordpress.org/latest.zip
--2022-10-22 14:36:04--  https://wordpress.org/latest.zip
Resolving wordpress.org (wordpress.org)... 198.143.164.252
Connecting to wordpress.org (wordpress.org)|198.143.164.252|:443... connected.
HTTP request sent, awaiting response... 200 OK
Length: 22774224 (22M) [application/zip]
Saving to: ‘latest.zip’

latest.zip                                         100%[===============================================================================================================>]  21.72M  6.72MB/s    in 3.2s

2022-10-22 14:36:08 (6.72 MB/s) - ‘latest.zip’ saved [22774224/22774224]

sohail@d1:/var/www$ sudo unzip -q latest.zip

sohail@d1:/var/www$ sudo chown -R www-data wordpress/

sohail@d1:/var/www$ sudo chgrp -R www-data wordpress/
With WordPress files in place, now I am ready to enable the config and restart Apache.
sohail@d1:/var/www$ sudo a2ensite wordpress.conf
Enabling site wordpress.
To activate the new configuration, you need to run:
  systemctl reload apache2

sohail@d1:/var/www$ sudo service apache2 restart
Installing WordPress
With successful setup of Apache HTTPD, MySQL and PHP, my next step is to install WordPress.
Open the URL in the browser and go to http://wordpress.local.
Since we are doing just a standard install, simply follow instructions shown as is. Copy the following information on the settings page.

Once the installation has completed open the URL http://wordpress.local and you will be your sparkling new website running.
With the default install there is only a single post Hello world! is showing. To do performance testing I will update the content of this post and add about 4,000 bytes of text to it. If you are following the exact steps you may want to just copy content from this page on my GitHub.
My Test Environment
Test machine
- Operating system: Windows 10 Professional 64 bits
- CPU: AMD ThreadRipper 1920X 12-core processor.
- RAM: 32 GB
- Storage: 8 TB
WordPress VM
- Operating system: Ubuntu 22.04
- CPU: 4 cores allocated
- RAM: 4 GB
- Storage: 100 GB
Test tool: Apache AB running from Windows host.
WordPress Performance Testing – First Run
The first thing I want to do is establish baseline performance numbers for WordPress with out of the box setting for Apache, MySQL, PHP and WordPress.
Note: I have noticed that 22.04 has OpCache enabled by default. Not sure if I turned it on by mistake by it is working. For this test I am going to run the following command before starting my test.
sohail@d1:/etc/php/8.1/mods-available$ sudo phpdismod opcache

sohail@d1:/etc/php/8.1/mods-available$ sudo service apache2 restart
My test URL: http://wordpress.local/2022/10/22/hello-world/
From command line window from my host machine I enter the following ab command.
C:\apps\apache\httpd\bin>ab.exe -n 1000 -c 5 http://wordpress.local/2022/10/22/hello-world/The result summary for the first run below.

Enabling PHP OpCache
Before going to the next performance run, I want to enable PHP OpCache. This should increase performance of the WordPress install.
So let’s start…
Install/Enable PHP OpCache on Ubuntu and Windows
With latest versions of Ubuntu OpCache is already installed and enabled. Since in previous versions it was not installed I had to first install it and then enable it.
Regardless since I did disable the OpCache in the first step, I will enable it here and restart Apache HTTPD.
sohail@d1:/etc/php/8.1/mods-available$ sudo phpenmod opcache

sohail@d1:/etc/php/8.1/mods-available$ sudo service apache2 restart
WordPress Performance Testing – Second Run
Second run is similar to the first, except that I now have enabled OpCache. Below are results of the AB test.

Results
Total time taken
The performance of the website has gone up significantly. From taking 56.161 seconds to complete the first run fetching 1,000 requests the time has gone down to 17.944 seconds.
Time/Request
Another significant improvement here. Time/request has also come down to 89.718 ms from 280.806 ms.
Third Test Run Setup
For this final test run, I need to setup the following.
- Redis server.
- Add PHP extension for Redis.
- Add Redis Object cache to WordPress.
Redis Server Install
sohail@d1:~$ sudo apt install redis-serverInstall PHP Extension for Redis
sohail@d1:~$ sudo apt install php-redis

sohail@d1:~$ sudo service apache2 restart
Install WordPress Redis Object Cache Plugin
Login to your WordPress and in Admin go to Plugins->Add New, and enter redis object cache in the search box.

Install the plugin and activate it.
To enable object cache you will need to go to Settings->Redis and click on Enable Object Cache button.
WordPress Performance Testing – Third Run
Now I have both PHP OpCache and Redis server installed with WordPress able to use the benefits of this extra layer of caching using the newly added plugin.
I am going to test the same URL in exactly the same manner to see if I can get additional performance improvements.
Here are my results.

Strange. I did not notice significant performance improvements. Request/second has gone up by 1.
I expected a lot more… Well maybe the cache plugin is not working. I went an looked at Redis and found that the plugin is working.
sohail@d1:~$ redis-cli
127.0.0.1:6379> keys *
 1) "wp:wp_theme_relationships:5"
 2) "wp:post_tag_relationships:1"
 3) "wp:comment:1"
 4) "wp:comment:get_comments-46612f2dd3b604b784c3eb3dac699d60-0.30692800 1666479464"
 5) "wp:posts:2"
 6) "wp:default:is_blog_installed"
There were many more entries but I only copied a subset to show that Redis cache is working. There maybe other factors at play such as lack of resources on the VM running the website.
I am going to increase resources for the virtual machine and re-run the tests.
Well, I did increase resources to the following values:
- RAM: 8 GB
- vCPU: 8 cores
What I found was that performance did go up. Another 18% or so. But running the test from Step 2 also resulted in increase in performance.
Conclusion of Testing
What I found is that enabling PHP OpCache significantly increases performance of a PHP based website.
Adding Redis cache to the mix, in scope of WordPress only with the plugin did not get me any significant improvement in performance. I am assuming it may help as the load on the site grows. This is where I will do further testing to figure out the scenario where Redis with WordPress can add value.
Lookout for an update on this…
Bonus Performance Section Using Reverse Proxy
Ok, in all of the testing I have done above, I was happy until I moved to the third run where I had both PHP OpCache enabled as well as a Redis server installed with a supporting WordPress Redis Object Cache plugin.
I thought why not go one step further and put an Nginx reverse proxy with caching enabled in front of the web server where I installed WordPress.
Check out my post on setting up Nginx as a reverse proxy and cache in front of Apache
Well, that is exactly what I did.
Note: I did adjust RAM and vCPU to match earlier test results so my test numbers are meaningful.
Shown below are the numbers I have with the following options enabled.
- PHP OpCache enabled.
- Nginx Reverse Proxy with Caching settings enable.
My test run with AB is the same as well using the following command.
ab.exe -n 1000 -c 5 http://wordpress.local/2022/10/22/hello-world/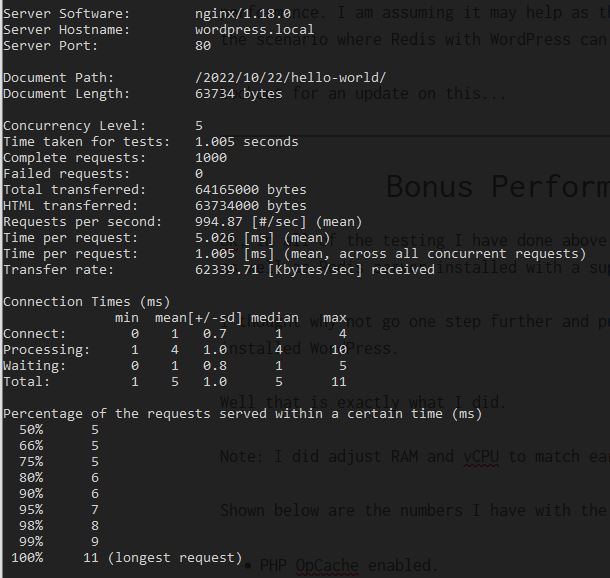
Conclusion (Final)
Oh, just plain awesome. Adding a reverse proxy with caching, and I will focus on the caching part, the performance shoots up crazy. From approximately 56 request/second it has gone up to 994 requests/second. That is an increase of over 1700%.
| 1st run No Caching | 2nd run PHP OpCache | 3rd run PHP OpCache and Redis | Bonus run PHP OpCache and RP Caching | |
|---|---|---|---|---|
| Total time for test | 56.161 seconds | 17.944 seconds | 17.64 seconds | 1.005 seconds |
| Requests / Second | 17.81 | 55.73 | 56.69 | 994.87 |
| Time / Request | 280.806 ms | 89.718 ms | 88.198 ms | 5.026 ms |
| Time / Request (across all threads) | 56.161 ms | 17.944 ms | 17.64 ms | 1.005 ms |
Sure in actual real life scenarios the improvements may be lower than this but I still expect significant improvements in performance by using a reverse proxy with Cache.
I do hope you found this post useful. Let me know if you have any questions on this.