In this post, I will go over the step-by-step process of setting up a Postfix SMTP server on Unbuntu. This post will be split in two parts, where the first part will be going over the following:
- Go over the pre-requisites
- Configure DNS for SMTP
- Install
postfixon Ubuntu - Configure
postfix - Setup UFW on Ubuntu
- Test
postfix
In the second part, I will go over advanced topics such as:
- Protect
postfixfrom SPAM: Install SPAM filters - Configure Blacklist blocking on Postfix
- Setup Virtual domains on Postfix
- Test SPAM email and Blacklist blocking on Postfix
What is Postfix SMTP Server?
Postfix is an open source SMTP server that runs on all Linux based and BSD operating systems. Bundled as a package with these operating systems, it is accessible and easy to install.
What makes it popular is that it can work with software IMAP, POP3 to provide additional services. Using spam, virus, and blacklist blocking solutions you can use it to create a safe and secure solution for creating email communication systems.
With postfix, you can create your own Email Marketing Solutions. Although Postfix itself does not provide list and campaign management options, you can use open source options like PHPMailer.
Prerequisites
Before you start setting up an email server with Postfix on Ubuntu, there are a few prerequisites that you need to have in place. These include:
- Ubuntu server: In the production environment, you should use the latest Ubuntu LTS server for installing and running
postfix. In the testing environment, you can use any version released within the last few years as well as the desktop version of Ubuntu. - Root access or superuser (su) privileges are required to install and configure
postfixon Ubuntu. - Domain name: You will need to have a domain name available that you want to use for email addresses. If you don’t have a domain name already you need to buy one for production setup. In development environments, you can make hosts file entries to set up domains and use them for setting up
postfix. - DNS server access: Access to a DNS server is required for your domain so you can create or modify MX, A, and SPF records to configure your email server.
- Firewall (optional): A firewall is not required for setting up the
postfixSMTP server. But to ensure the security of your email server you should set one up. Ubuntu comes with Uncomplicated Firewall (UFW), a free option and I will be using that for setting up the port and access control.
Before proceeding forward ensure you have all the required prerequisites in place before starting to set up postfix.
Configure DNS For SMTP, Sending and Receiving of Emails
Before starting on setting up SMTP, the first step is to setup DNS records for my domain.
Note: I will be using the domain of my own website FreeServerMonitor.com for setting up the SMTP server. You should use your own domain name.
Let go over each of these steps:
Step 1: Create MX Record for the Domain
First, create an A record:
mail.freeservermonitor.com. IN A 192.168.1.100MX Record specifies the mail server for your domain. This will be set up in the DNS Zone file if you are working directly with the file system.
example.com. IN MX 10 mail.example.com.Many DNS providers have user interfaces set up to manage the DNS records. I am using Cloudflare and will use it to create a new MX record for my email server.
In Cloudflare, I first create an A record to point to my actual server IP address. I will proxy the IP so my actual address is not hidden.
| Type | Name | IPv4 Address | Proxy status |
|---|---|---|---|
| A | mail (you can use any name here. I am using mail) | 192.168.1.10 | Proxied |
The second step is to create the actual MX record. Following are my settings:
| Type | Name | Content/Value | TTL* | Priority* |
|---|---|---|---|---|
| MX | @ | mail.freesevermonitor.com | Auto | 10 |
A few things to note here:
- Type: This is always set to MX for mail server records.
- Content/Value: You can setup multiple MX records. But each one will need to point to a separate A record.
- TTL: The time to live field is a number. Setting it to Auto allows Cloudflare to manage this value. You can use actual numbers here. So if you wanted to have the entry expire in 60 minutes then you can enter 3600.
- Priority: This becomes important when using multiple email servers. The one with a higher priority is used first. For example, if I had two email servers then I would set the first to 10 and the second to 20.
Create an SPF Record (Optional)
A Sender Policy Framework (SPF) record is a type of DNS TXT record that lists all the servers authorized to send emails from a particular domain. In the past, it had its own record type, but now a TXT record is stored.
| Type | Name | Content | TTL |
|---|---|---|---|
| TXT | freeservermonitor.com | v=spf1 ip4=192.168.1.10 include:freeservermonitor.com -all | Auto |
The important thing to note for this entry is the Content entry. Let’s quickly go over the format and options.
- v=spf1: This value tells the server looking at the TXT record that this contains an SPF record. Every SPF record must begin with this string.
- ip4: This is a list of IP addresses that are authorized to send emails on behalf of the domain. You can have more than one IP address. When using 2 addresses the string will be “ip4=192.168.1.1 ip4=192.168.1.2”. (replace with your own IPs).
- include: Used for third-party senders, this tag contains the domain name of the authorized domain that can send emails on behalf of this domain.
- -all: Any IP not listed in the SPF record are not authorized to send emails and should be rejected. Other options are ~all (states that unlisted email will be marked as insecure) and +all (stats that any server can send emails on your behalf, a value that you should not use).
Create a DMARC Record for Compliance (Optional)
DMARC is an email validation system that helps ensure that emails are sent only by authorized users. DMARC policies dictate what to do with failed SPF and DKIM checks. Based on the DMARC policy, set with the p option, incoming emails will be marked as spam or rejected. All other emails are delivered as normal.
Using the rua attribute, you can define an email address to receive reports about email activity.
| Type | Name | Content | TTL |
|---|---|---|---|
| TXT | _dmarc | v=DMARC1; p=reject; rua=mailto:[email protected] | Auto |
If you have followed the steps above, then your DNS is set up for sending and receiving emails for your SMTP server.
Install Postfix on Ubuntu
To install Postfix on Ubuntu, follow the steps below.
Login to your Ubuntu server with root access or su privileges.
Update the apt repository.
root@ubuntu:~# sudo apt updateInstall Postfix using the following command:
root@ubuntu:~# sudo apt install postfixDuring the installation process, you’ll be prompted to choose the type of mail configuration you want.
Since I am setting up a public server, I will use the Internet Site option.
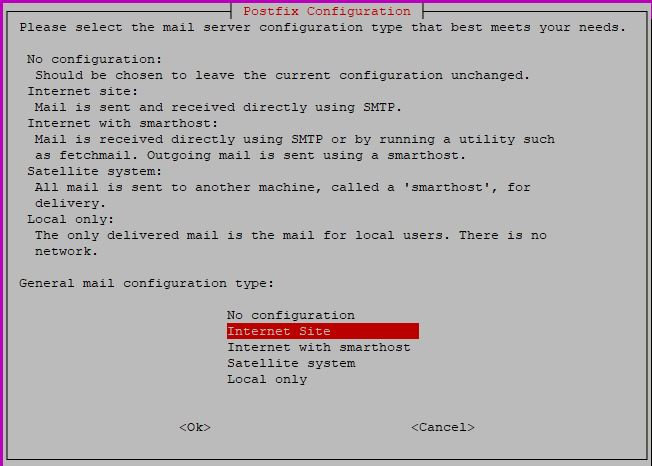
On the next screen enter your domain name.

Once you enter all the required information, the installer copied all the files and makes appropriate configuration changes.
Shown below are some important lines from the output of the installation script are:
Adding group `postfix' (GID 122) ...

Adding system user `postfix' (UID 116) ...
Adding new user `postfix' (UID 116) with group `postfix' ...

Not creating home directory `/var/spool/postfix'.

Creating /etc/postfix/dynamicmaps.cf
Adding group `postdrop' (GID 123) ...

changing /etc/mailname to freeservermonitor.com
setting myorigin
setting destinations: $myhostname, freeservermonitor.com, ubuntu-4gb-hil-1, localhost.localdomain, localhost
setting relayhost:
setting mynetworks: 127.0.0.0/8 [::ffff:127.0.0.0]/104 [::1]/128

/etc/aliases does not exist, creating it.

Postfix (main.cf) is now set up with a default configuration.
After completing the installation, you can verify that Postfix is running by checking its status using the following command:
root@ubuntu:~# sudo systemctl status postfixIf Postfix is running, you should see a message indicating that the service is active and running.
Now that Postfix is successfully installed let’s look at the configuration files next.
Postfix Configuration Files and Settings
The configuration files for Postfix are stored in the folder /etc/postfix/. The name of the main configuration file is main.cf.
Open in up in the editor of your choice, nano, vi or emacs and review some settings.
root@ubuntu# vi /etc/postfix/main.cf

************** Important Settings Below **************


myhostname = ubuntu-4gb-hil-1
alias_maps = hash:/etc/aliases
alias_database = hash:/etc/aliases
myorigin = /etc/mailname
mydestination = $myhostname, freeservermonitor.com, ubuntu-4gb-hil-1, localhost.localdomain, localhost
relayhost =
mynetworks = 127.0.0.0/8 [::ffff:127.0.0.0]/104 [::1]/128
Below is description of some of the configuration attributes in the main.cf file.
| Attribute | Value | Descriptions |
|---|---|---|
| myhostname | freeservermonitor.com | Set to your domain name. |
| mynetworks | 127.0.0.0/8 [::ffff:127.0.0.0]/104 [::1]/128 | Specifies the networks that are allowed to use your email server. The values shown here are for class C networks. |
Our basic server configuration is now complete.
Testing the Default Setup
Before moving forward to a more advanced setup, let’s do a test to ensure that the server is able to send and receive emails.
I will use the mail command for this testing. Since mail is not installed by default on the Ubuntu server, first install it by using the following command.
root@ubuntu# sudo apt install mailutilsThen enter the command mail to start the shell utility to send and view emails.
root@ubuntu:~# mail
No mail for root
Typing the mail command gives a message that there is no mail for root.
Let’s create a mail to send to an existing user on the server.
root@ubuntu:~# mail -s "Test email" root
Cc:
test message

root@ubuntu:~# mail
"/var/mail/root": 1 message 1 new
>N   1 root               Mon Feb 27 20:36  14/441   Test email
?
The below steps with line numbers describe the process of sending an email with the mail command.
- Enter the
mailcommand to send email to root users. - Press enter, as we are not going to use the cc option.
- Enter the body text of the email.
- Press the Ctrl+D key to complete sending the message.
After successfully submitting the email, let’s see if the user received it. Simply enter the mail command and you should see the following response.
root@ubuntu:~# mail
"/var/mail/root": 1 message 1 new
>N   1 root               Mon Feb 27 20:36  14/441   Test email
?
Great!
Postfix is actually sending emails now.
Next, I am going to send an email to an actual user on freeservermonitor.com, using the same process.
root@ubuntu:~# mail -s "First email" [email protected]
Cc:
First email text

root@ubuntu:~# su testuser
tutank@ubuntu:~$ mail
"/var/mail/testuser": 1 message 1 new
>N   1 root               Mon Feb 27 20:44  14/468   First email
?
Not sure about you, but I am excited that a user on my domain is actually receiving the email on the domain.
Setup UFW on Ubuntu for Postfix
Setting up the Uncomplicated Firewall (ufw) for postfix is an important piece of software to secure your server. ufw is a front-end for the iptables firewall.
Follow the steps below to setup ufw on the Ubuntu server.
root@ubuntu:# sudo apt install ufw- Install UFW: If you haven’t already installed UFW, you can do so by running the following command:csharp
sudo apt-get install ufw
Once ufw is installed use the following commands to open various ports and services for public access.
root@ubuntu:# sudo ufw allow ssh
root@ubuntu:# sudo ufw allow 25/tcp
root@ubuntu:# sudo ufw allow 587/tcp
root@ubuntu:# sudo ufw enable
With the commands avove I have opened port for ssh and mail (25,587).
Check the status of the firewall with the command below.
root@ubuntu:~# sudo ufw status
Status: active

To                         Action      From
--                         ------      ----
22/tcp                     ALLOW       Anywhere
25/tcp                     ALLOW       Anywhere
587/tcp                    ALLOW       Anywhere
443                        ALLOW       Anywhere
80/tcp                     ALLOW       Anywhere
22/tcp (v6)                ALLOW       Anywhere (v6)
25/tcp (v6)                ALLOW       Anywhere (v6)
587/tcp (v6)               ALLOW       Anywhere (v6)
443 (v6)                   ALLOW       Anywhere (v6)
80/tcp (v6)                ALLOW       Anywhere (v6)
As you can see I have exposed SSH, SMTP, and HTTP(S) ports through the firewall.
This completes our base install of postfix on Ubuntu.
In the next upcoming part 2 of postfix setup I will be exploring advanced topics such as setting up postfix to accept email for multiple virtual domains and configuring it for protection against spam, viruses, and malicious IP addresses.
Frequently Asked Questions
What is Postfix?
Postfix is an open-source mail transfer agent (MTA) that is widely used for sending and receiving emails on Linux and Unix-like systems over the SMTP protocol. It is known for its reliability, security, and ease of use.
How do I install Postfix?
Postfix can be installed using the package manager of your Linux distribution. At the start of this post I provide detailed directions on how to setup postfix.
How do I configure Postfix?
Postfix configuration is done through the main configuration file, which is usually located at /etc/postfix/main.cf. You can edit this file to configure various settings, such as mailboxes, spam filtering, and DNS configuration.
With the install of postfix, there is also a command line tool, postconf, that can be used to set and change the values in teh configuration file.
How do I test the configuration of Postfix?
You can test the configuration of the postfix SMTP server by sending and receiving email.
You can use the mail, sendmail or dig command to test various aspects of the configuration.
How do I secure Postfix?
Multiple strategies can be used to secure postfix and email services. Listed below are some suggestions:
- DNS Records: Use SPF, DKIM, and DMARC records to secure the ID and protect against spammers using your domain for sending spam and other unwanted emails.
- Use firewall solutions, such as
ufwon Linux based operating systems. - Regularly apply security patches to the operating system and update server software.
- Monitor system intrusion activity.
How do I set up spam filtering on Postfix?
Postfix supports various spam filtering mechanisms, such as SpamAssassin and Postgrey. In the second part, advanced postfix installation, I will be going over the installation and configuration of spam filters.
How do I configure Postfix to use SSL/TLS?
When installed using the apt package manager, postfix is preconfigured to use SSL/TLS for secure communications.
In the /etc/postfix/main.cf file, the following three attributes point to the certificate located on the file system.
smtpd_tls_cert_file = /etc/ssl/certs/postfix.pem
smtpd_tls_key_file = /etc/ssl/private/postfix.key
smtpd_use_tls = yes
How do I monitor Postfix for issues or errors?
postfix logs information through the syslogger. Additional logging information can be found in the files /var/log/mail.err and /var/log/mail.log.
How do I set up virtual domains on Postfix?
Postfix supports setting up virtual domains, which allows receiving email for multiple domains. For this, to work you need to create a virtual file that maps email addresses to local or remote mailboxes, and then configure postfix to use them.
virtual_alias_domains = example.com
virtual_alias_maps = hash:/etc/postfix/virtual
There are other configuration options involved and I will be going over those in the second part of this tutorial.
Conclusion
As you saw setting up postfix on Ubuntu is an involved process. What you saw in this post is just the start. There is a lot more that needs to be done, such as installing dovecot, for IMAP and POP3 support.
With the rise in spam emails, SMTP servers are prime targets of unethical hackers. You need to protect your server against these threats by installing at the minimum a firewall, and then spam and junk email prevention software alongside IP blacklist protections. I will be going over these advanced setup options in my upcoming post.