Introduction
In this post, I will go over details of how to install Nginx webserver and PHP on Windows 10, 11 or Windows Server. I will show where to download and how to do the configuration of Apache and integration with PHP.
I will also discuss some advanced configuration options for the setup as well.
Installing Nginx Webserver
Apache webserver files and all related information is located on the Nginx Opensource Project website.
Download Apache Webserver
You can access the Nginx source code repository if you are planning to build it from scratch. In our case, I will download a prebuilt version of the software from here.
Note that there are two versions of the server available to download.
- Mainline: This is the latest with the newest features. It should be used for testing the latest features. I find it very usable to development purposes as well.
- Stable: Lastest stable version to be used in production.
Either one of these will work for this guide. I will download the stable version to match what I have in production on my servers.
Go ahead and download the zip file from the Nginx website.
Installing Nginx Webserver
Once your download is complete, you can unzip the files in any location on your computer. I am going to install all the files in the C:\apps\nginx\ folder.
The structure of the folder will be:
C:\apps\nginx>dir
 Volume in drive C has no label.
 Volume Serial Number is 6615-FCF1

 Directory of C:\apps\nginx

04/09/2022  01:14 PM    <DIR>          .
04/09/2022  01:14 PM    <DIR>          ..
04/09/2022  01:10 PM    <DIR>          conf
04/09/2022  01:10 PM    <DIR>          contrib
04/09/2022  01:10 PM    <DIR>          docs
04/09/2022  01:10 PM    <DIR>          html
12/29/2022  01:47 PM    <DIR>          logs
04/09/2022  01:10 PM         3,751,936 nginx.exe
04/09/2022  01:14 PM    <DIR>          ssl-certs
04/09/2022  01:15 PM    <DIR>          temp
Copying the contents of the Nginx zip file is all that is required for a valid install of Nginx webserver on Windows.
In the next section I will go over details of running Nginx and serving file. But before we get to that let’s go over details of some important folders.
CONF Folder
Conf folder contains all configuration files, including the main nginx.conf file.
HTML Folder
html folder contains the default index.html file that comes with the webserver. html folder also has a 50x.html file that Nginx uses to show errors.
The default configuration will serve all files from this folder. You can override this behavior by using Virtual Host configurations. A setup I will review towards the end of this post.
LOGS folder
logs folder maintains logs, both access and error, for configured websites being served by Nginx.
Now that I have the default install complete, let’s go over details of running the webserver.
Running Nginx From Command Line
There are two ways to run Apache from the command line.
# First
C:\apps\nginx>nginx.exe

# Second
C:\apps\nginx>start nginx.exe
The first method will run the executable as a child process of the existing shell and will block until you exit the process by either killing the Nginx process through the Task Manager or by using another command prompt window and sending a stop or shutdown signal using the -s option to the nginx.exe executable.
C:\apps\nginx>nginx.exe -s stop (or use shutdown instead of stop)This will usually shutdown Nginx but I have found that the signal does not work consistently on Windows and therefore I use the Task Manager to kill the process.
Note: Pressing CTRL+C does not stop the Nginx webserver. Even closing the command prompt will not kill the Nginx process.
The second method uses the start command and will create a new command window that will execute the nginx.exe process and will exit. Even though the command prompt will exit the Nginx webserver will continue running.
You can view the running process in Task Manager as well.

Validating Nginx Webserver Install
After Installing Nginx and running it from the command prompt you can go to the browser and open the URL http://localhost. The default index.html file will be viewable if all installation steps were correctly executed.

Installing Nginx as a Windows Service
Unlike Apache webserver on Windows, Nginx does not come with built-in commands to install it as a Windows service. You will have to download additional utilities to set it up as a service. Microsoft has a good article on how to create a user-defined service using Windows resource kit.
Another way to have Nginx start up when you login to Windows is by creating a link to nginx.exe from the Startup programs folder. Listed below are details on how to do this.
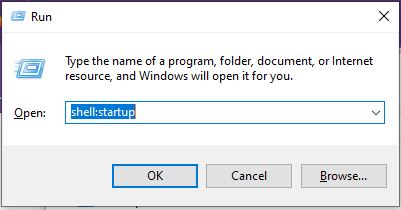
First press Windows+R key. This will pop open the run dialog. Enter shell:startup command.

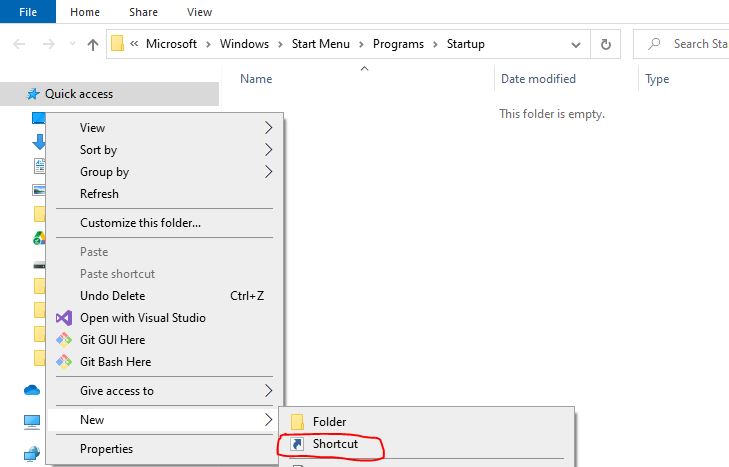
This will open the startup folder showing list of programs Windows will start upon user login.

Create a new shortcut and browse to the Nginx folder and select nginx.exe.
Once this is complete you will have Nginx startup after logging in to Windows.
Installing PHP on Windows
To install PHP go to the website and download the latest version of PHP.
On the download page, you will find two different types of PHP downloads.
- NTS or Not thread-safe
- Thread-safe
I will be doing an install of PHP in FastCGI mode and therefore will be downloading the thread-safe version. Do note that NTS version has better performance.
Install PHP Locally
After downloading PHP zip file, unzip and copy the contents to a folder. I will install it at location C:\apps\lang\php. The folder contents will be:
C:\apps\lang\php>dir

 Directory of C:\apps\lang\php

01/15/2023  11:58 AM    <DIR>          .
01/15/2023  11:58 AM    <DIR>          ..
01/15/2023  11:51 AM           137,728 deplister.exe
01/15/2023  11:51 AM    <DIR>          dev
01/15/2023  11:51 AM    <DIR>          ext
01/15/2023  11:51 AM    <DIR>          extras
01/15/2023  11:51 AM         1,609,728 glib-2.dll
01/15/2023  11:51 AM            18,944 gmodule-2.dll
01/15/2023  11:51 AM        30,422,016 icudt71.dll
01/15/2023  11:51 AM         3,031,552 icuin71.dll
01/15/2023  11:51 AM            60,928 icuio71.dll
01/15/2023  11:51 AM         2,253,312 icuuc71.dll
01/15/2023  11:51 AM    <DIR>          lib
01/15/2023  11:51 AM         5,192,704 libcrypto-3-x64.dll
01/15/2023  11:51 AM            42,496 libenchant2.dll
01/15/2023  11:51 AM           289,792 libpq.dll
01/15/2023  11:51 AM           209,920 libsasl.dll
01/15/2023  11:51 AM           303,616 libsodium.dll
01/15/2023  11:51 AM         1,646,080 libsqlite3.dll
01/15/2023  11:51 AM           380,928 libssh2.dll
01/15/2023  11:51 AM           776,192 libssl-3-x64.dll
01/15/2023  11:51 AM             3,272 license.txt
01/15/2023  11:51 AM            20,972 news.txt
01/15/2023  11:51 AM           228,352 nghttp2.dll
01/15/2023  11:51 AM                43 phar.phar.bat
01/15/2023  11:51 AM            65,969 pharcommand.phar
01/15/2023  11:51 AM            69,120 php-cgi.exe
01/15/2023  11:51 AM            38,400 php-win.exe
01/15/2023  11:51 AM           142,336 php.exe
01/15/2023  11:51 AM            75,124 php.ini-development
01/15/2023  11:51 AM            75,272 php.ini-production
01/15/2023  11:51 AM            35,840 php8apache2_4.dll
01/15/2023  11:51 AM           932,824 php8embed.lib
01/15/2023  11:51 AM           278,016 php8phpdbg.dll
01/15/2023  11:51 AM         9,049,088 php8ts.dll
01/15/2023  11:51 AM           280,064 phpdbg.exe
01/15/2023  11:51 AM            30,888 readme-redist-bins.txt
01/15/2023  11:51 AM             5,364 README.md
01/15/2023  11:51 AM             2,285 snapshot.txt
The following files and folders are important to note:
EXT Folder
The ext folder includes all modules provided with PHP. Modules provided additional features which can be added to PHP by enabling them through config files.
PHP.INI* Files
Multiple sample config files are provided with PHP. We will use the config file to manipulate configuration settings as well as enabled various features.
Note: Please make a copy of the file php.ini-development and rename it to php.ini. This will be used later.
PHP.exe
This is a command line executable of PHP used to run command line scripts.
Add PHP to Windows Path
There is one additional step you will need to complete to ensure that all PHP modules will correctly work. For example, if you are going to enable the PHP CURL module, used with WordPress installs, then you need to add the PHP installation folder to the Windows path.
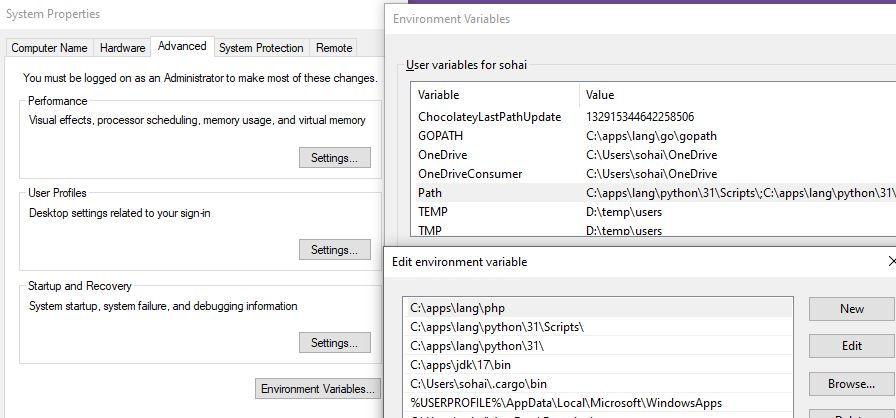
Edit the system environment variables by going to Settings and type env in the search box and open the “Edit the system” option. Click on the Environment Variables button and update the Path variable and add the PHP folder path.
Using my folder path, the setting will look like the following:

Once you have added the path. Save all changes.
Setup PHP FastCGI
Apache server on Windows can load PHP as a module. Nginx on the other hand does not directly load PHP as a module but uses the FastCGI mechanism to support web pages with PHP code.
Create PHP FastCGI Script
Create a new file, php-fcgi.bat in and save it to the folder C:\apps\lang\php\php-fcgi.bat.
Add the following content to php-fcgi.bat and save.
@ECHO OFF
ECHO Starting PHP FastCGI...
set PATH=C:\apps\lang\php;%PATH%   # I have already added PHP to the path so this line is optional.
start C:\apps\lang\php\php-cgi.exe -b 127.0.0.1:9123
Run the script from the command line.
C:\apps\nginx>start nginx.exeThis will start PHP fast CGI process in a new command prompt window.
Create PHP Test File
With the changes in place, let’s create a PHP test file.
Open a text editor and copy the following text to it.
<?php
phpinfo();
In this file I am using a built in PHP funtion phpinfo, which prints PHP configuration as HTML text.
Save this file to the location C:\apps\nginx\html and name it index.php.
Testing Complete Nginx & PHP Install
Now that both Apache and PHP have been installed and configured, to test the setup by first making a change to Nginx webserver configuration file.
Open the file nginx.conf located at C:\apps\nginx\conf\nginx.conf and either add the following lines to the default server block or uncomment the existing PHP location block while updating the PHP port we setup in the script.
location ~ \.php$ {
	fastcgi_pass   127.0.0.1:9123;
	fastcgi_index  index.php;
	fastcgi_param  SCRIPT_FILENAME  $document_root$fastcgi_script_name;
	include        fastcgi_params;
}
After making the change above, start (or restart Nginx server) for the settings to take effect.
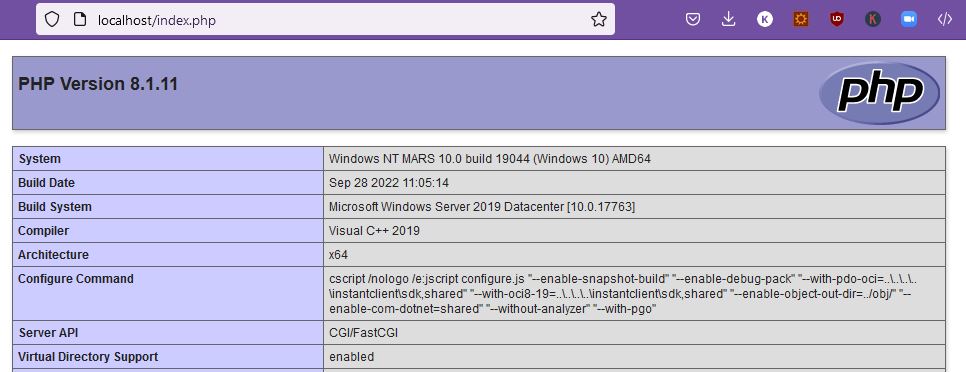
Once the server is up and running, then go to the browser and enter the url, http://localhost/index.php.
If everything is configured correctly a web page similar to the one below display PHP configuration will be shown.

This completes Nginx, PHP setup and configuration on computers running Windows 10, 11 or Windows Server.
Bonus Section
In this section, I will review some useful configuration tips.
Download All Configuration and Setup Files Used in this Post
You can download the complete set of configuration, executable scripts and utilities discussed and used in this tutorial from our website. Click on this link to download all tutorial files.
How to Start Nginx From Command Prompt
Go to the Nginx install folder. Let’s assume it is installed at C:\apps\nginx, and run the following command.
C:\apps\nginx>start nginx.exeHow to Stop Nginx on Windows from Command Prompt
You can use the -s signal options with either quit or stop command.
C:\apps\nginx>nginx.exe -s stopIf the Nginx webserver is not running then you will see the following message.
C:\apps\nginx>nginx.exe -s quit
nginx: [error] CreateFile() "C:\apps\nginx/logs/nginx.pid" failed (2: The system cannot find the file specified)
This just shows that the Nginx webserver is currently not running.
How to Install SSL Certification on Nginx
To install or setup a SSL certificate with Nginx you need to modify the server block.
The default nginx.conf file has a server block setup that is listening on port 80. Make the following changes to the existing server block or copy it to a new server block.
Here is an example of a server block set up to listen to incoming SSL requests. This configuration also supports PHP through FastCGI.
server {
	listen 443 ssl;
	listen [::]:443 ssl;

	server_name localhost;

	ssl_certificate C:/apps/nginx/ssl-certs/nginx.crt;
	ssl_trusted_certificate C:/apps/nginx/ssl-certs/nginx.crt;
	ssl_certificate_key C:/apps/nginx/ssl-certs/nginx.key;

	location / {
		root   html;
                index  index.html index.htm;
	}

	location ~ \.php$ {
		fastcgi_pass   127.0.0.1:9123;
		fastcgi_index  index.php;
		fastcgi_param  SCRIPT_FILENAME  $document_root$fastcgi_script_name;
		include        fastcgi_params;
	}
}
You can download sample certs from our website by clicking here.
How to Setup Nginx Virtual Hosts
For Nginx to serve multiple domains or hosts you need to create different server blocks, each one serving a different domain. To add an additional virtual host add the following code to existing nginx.conf file.
server {
	listen 80;

	server_name example.com;

	location / {
		root   html;
                index  index.html index.htm;
	}
}
This configuration adds the ability to serve domain example.com by Nginx.
Note: After making changes restart the Nginx webserver for it to pickup changes.
Hiding Command Prompt Windows For Background Tasks
I don’t like command prompt windows running programs but just hanging in the background. If you are like me then you probably would like to hide the PHP FastCGI program window.
There is a utility HideWindowsConsole that you can download my our website and use it to run PHP FastCGI.
Make the following changes to your PHP FastCGI script to start the script with a hidden window.
@ECHO OFF
ECHO Starting PHP FastCGI...
set PATH=C:\apps\php;%PATH%
C:\apps\misc\HideWindowsConsole.exe C:\apps\php\php-cgi.exe -b 127.0.0.1:9123
Conclusion
In this post, I went over details on setting up Nginx on the Windows operating system. On my Nginx web server page, you will find many more tutorials on Nginx.